.webp)

Teeth whitening is a popular cosmetic dental treatment that many people turn to when they want a brighter, more confident smile. One of the most effective ways to achieve this is through professional in-chair whitening, which is performed at a dental office. Unlike home whitening kits, which can take days or weeks to show results, in-chair whitening can provide noticeable improvements in a single session.
This procedure involves using a special whitening gel, usually containing hydrogen peroxide, which is applied directly to your teeth. The gel breaks down stains and discoloration on the surface of your teeth, leaving them looking brighter and cleaner. If you're considering this treatment, it's important to understand what to expect during the process so you can make an informed decision. Here’s a detailed breakdown of the in-chair whitening procedure and everything you need to know before you go.
What is In-Chair Whitening?
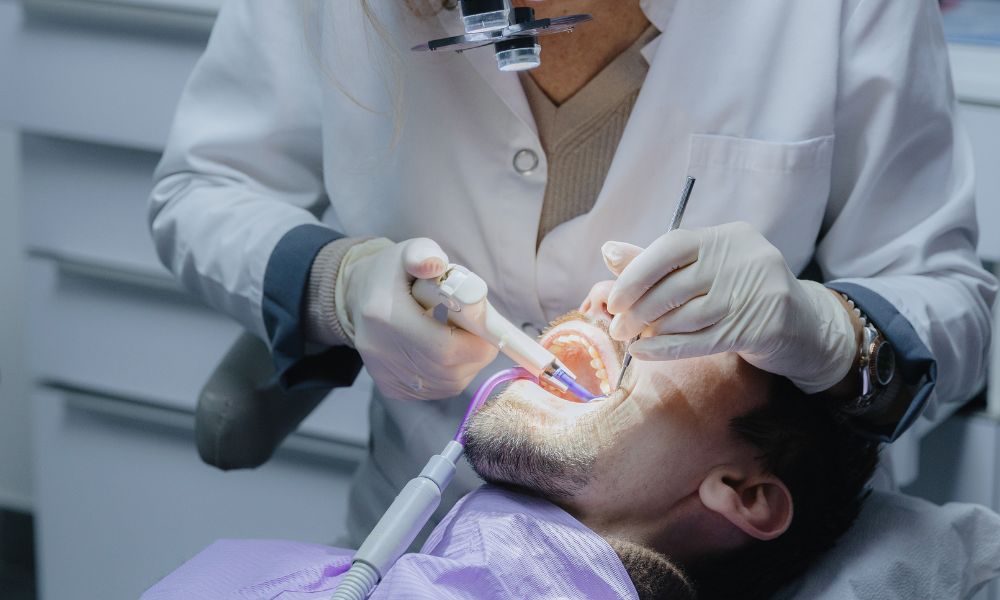
In-chair whitening is a professional teeth whitening treatment that takes place in the dentist's office. Unlike at-home whitening treatments, this procedure offers fast results and is carried out under the supervision of a dentist or dental hygienist. During the session, a bleaching agent is applied to your teeth, and sometimes a special light is used to activate the whitening process. This ensures that your teeth get whiter in less time.
The main advantage of in-chair whitening is that it works quickly. You can leave the dental office with a noticeably brighter smile in about an hour. This makes it a great option for people who need immediate results for a special occasion or those who don’t want to spend weeks waiting for their teeth to whiten.
Preparing for the In-Chair Whitening Procedure
Before the whitening treatment begins, your dentist will take several steps to ensure you are ready for the procedure.
-
Initial Consultation: During your first visit, you’ll talk to your dentist about your whitening goals. They will ask about your dental history and any health concerns, such as allergies or tooth sensitivity. It’s essential to discuss any issues like cavities or gum disease, as these may need to be treated before whitening.
-
Oral Examination: The dentist will check your teeth and gums to make sure your mouth is healthy enough for the procedure. If there are any underlying issues such as cavities or gum problems, they will need to be addressed first. Whitening will be most effective on healthy teeth.
-
Teeth Cleaning: Your dentist will clean your teeth to remove plaque and tartar buildup. This helps the whitening gel to work better and ensures the surface of your teeth is clean for a more even result.
-
Shade Assessment: Your dentist will assess the current color of your teeth using a shade guide to determine the starting point. This will help set realistic expectations for how much whiter your teeth can become after the treatment.
The In-Chair Whitening Process
The in-chair whitening procedure is fairly straightforward, but it involves several key steps to ensure the best results.
-
Protecting Your Gums: Before the whitening gel is applied, your dentist will protect your gums using a special barrier. This helps prevent the whitening gel from irritating your gums during the treatment.
-
Application of the Whitening Gel: Once your gums are protected, the dentist will apply the whitening gel to your teeth. This gel contains a bleaching agent that breaks down the stains on your teeth, making them lighter in color. The gel will remain on your teeth for about 15 to 30 minutes, depending on the level of whitening you want.
-
Activation of the Whitening Gel: In some cases, your dentist may use a special light or laser to speed up the whitening process. This light activates the whitening gel, allowing it to work more effectively and quickly.
-
Reapplication (Optional): If you're looking for more dramatic results, the whitening gel may be reapplied and activated again. This may happen several times during the session, depending on how many shades lighter you want your teeth to be.
-
Final Rinse and Evaluation: After the whitening gel has worked its magic, the dentist will rinse your mouth and remove any protective barriers from your gums. The dentist will then evaluate the results and may use a shade guide to compare your before and after teeth color.
After the Whitening Treatment
After your in-chair whitening session, there are a few things you should know to maintain your results and ensure your teeth stay healthy.
-
Sensitivity: It's common to experience some tooth sensitivity after the whitening treatment. This is usually temporary and should subside within a few hours to a couple of days. If the sensitivity continues, your dentist may recommend desensitizing products to help reduce discomfort.
-
Avoid Staining Foods and Drinks: After the whitening session, your teeth will be more porous, meaning they can absorb stains more easily. For the first 24 to 48 hours, it's important to avoid foods and drinks that can stain your teeth, such as coffee, tea, red wine, and dark berries.
-
Good Oral Hygiene: To maintain your bright smile, it’s important to practice good oral hygiene. Brushing your teeth twice a day, flossing regularly, and using a fluoride mouthwash will help prevent staining and keep your teeth healthy.
-
Touch-Up Treatments: Depending on your lifestyle and the level of whitening you desire, you may need touch-up treatments from time to time. Your dentist can recommend the best way to keep your teeth looking their best, whether it’s through occasional in-chair whitening or home whitening kits.
Why Choose In-Chair Whitening?
There are several reasons why many people prefer in-chair whitening over other whitening options.
-
Immediate Results: One of the main advantages of in-chair whitening is that it provides immediate results. Unlike at-home whitening methods, which can take weeks to show noticeable changes, you can leave the dentist's office with a significantly brighter smile after just one session.
-
Professional Supervision: In-chair whitening is done under the supervision of a trained dental professional. This ensures that the treatment is both safe and effective, with minimal risk of complications.
-
Long-Lasting Results: In-chair whitening typically offers longer-lasting results compared to at-home treatments. With proper aftercare, your teeth can remain whiter for months, giving you the confidence to smile.
-
Customized Treatment: Your dentist can customize the whitening treatment to suit your needs. Whether you want a subtle change or a more dramatic transformation, the procedure can be adjusted to help you achieve your desired results.
Is In-Chair Whitening Right for You?
While in-chair whitening is effective for many people, it’s not suitable for everyone. There are a few factors to consider before choosing this treatment.
-
Dental Health: If you have cavities, gum disease, or other dental problems, these issues should be addressed before undergoing whitening. The procedure works best when your teeth and gums are healthy.
-
Expectations: If you're hoping for a significant improvement in your smile, in-chair whitening is a good option. However, if your teeth have deep, internal stains, you may need more than one session to achieve the desired results.
-
Lifestyle: If you drink a lot of coffee, tea, or red wine, or if you smoke, you may need additional treatments to maintain the results. In-chair whitening can give you a bright smile, but regular touch-ups may be necessary to keep your teeth looking their best.
Conclusion
A professional in-chair whitening session is an excellent option if you're looking for a fast, effective way to brighten your smile. By understanding the process, what to expect during the procedure, and how to care for your teeth afterward, you can make an informed decision about whether this treatment is right for you. With the help of your dentist, you can achieve a noticeably brighter smile in just one visit and enjoy long-lasting results with proper care. If you’re ready to make your smile shine, talk to your dentist about in-chair whitening today.